Wednesday, July 11, 2012

Turning A Storage Box Into A Traveling Car Center

9 1/2 hrs in the car. ONE WAY! That's what I'm looking forward to at the end of the month. I've been racking my brain with how to keep them amused and entertained for that long of time because my boys do not like to draw or write or even color. So the traditional coloring books and what not are out. So I was at Big Lots today looking at little toys. My requirements were:
1) not too many loose parts to lose.
2) nothing that can be thrown at the driver or other passengers if we stopped suddenly or they got frustrated with it.
3) nothing too expensive. I'm on a budget here.

We already have the DVD player that we put in the car for long car trips. My rule is that it only goes on for trips longer than 1 1/2 hrs. (The time it takes to get to the closest grandparent) That way they don't get bored with it or I don't have to hear the same episode of Tom & Jerry for the 100,000th time!

So some of the things that I found:
Gone Fishing Magnetic travel game
Maze puzzles (the type you wiggle to get the ball to go where you want)
Hungry Hippos travel
BINGO
3 Lego knock-off sets (yeah this one broke my little pieces rule... I find I'm apathetic to losing lego pieces)
Dry Erase boards
Dry Erase markers
and last but not least
2- 12 qt tubs to store it all in
no slip shelf liner

I debated about how to contain the chaos. I had read on one of the pintrest pins that one lady had found shower caddy's and attached them to the back of the front seats... and I REALLY wanted to do that. But could NOT find anything remotely suitable to hand from my car. So I had to come up with plan B. Plan B was to find storage tubs that they could also use as desks because I was not going to also pay $10-14 for a lap desk that I would also have to find space for in my car. So I decided to turn the lids of the storage tub into the top of the lap desk.

How I started. First I took a fleece blanket that was too little for anyone to use anymore and I found some leftover batting from a previous quilting project. So that part didn't cost me any money.

Then I cut the batting and fleece so that it would be thick enough to pad their legs and still not take up too much space. I think I decided 3-4 layers of batting and about a 1 1/2 inch bigger on the the fleece.

Next I grabbed a handful of heavy card stock out of my paper supplies (if you don't have this cut up a cereal box or any heavy duty box you have on hand to stiffen the whole thing up a little bit. And I sewed the whole thing shut like I was upholstering a chair. Tucking in the corners first and the pulling the edges taut. This was my first one... my second one came out a little neater because I had practice. The only reason I sewed it was to make it easier to handle when I flipped it over. You can hot glue this step to save yourself some time. I just happen to not have a hot glue gun.

Glue it to the lid. Make sure it's pressed on there well by using something heavy. I used gorilla glue because that's what we have in the house. Use what you have on hand.

The storage boxes cost me $3.50 each at the Dollar General. I think it's totally worth it. If I throw some of their other toys in there and some snacks. I think we all may just survive the drive!

Monday, April 2, 2012

Lego Landspeeder Cake


A friend called me to invite my son to her son's birthday party, while we were on the phone she was listing all of the stuff that she had to do yet for the party and since I had just thrown a Lego themed birthday party for my 7yr old I was willing to give her all of the help and resources that I had already found. Then she mentioned that she was just going to go to the store and order a cake. ~Wait!?! What!?!~  The last time I ordered a store cake my then 2 yr old pulled the firetruck off of it, licked the icing off the wheel and that was the last time we've ever seen that wheel! If we're lucky it's passed through him by now (he just turned 7) but I'm not willing to bet on that.

So I volunteered (OK honestly I insisted) that I be allowed to make the birthday cake. PLEASE!!!!!!!! She relented, probably happy to have one more thing checked off of her ever growing to-do list. After finding out that I'm not willing to make a cake with 100 storm troopers on it (I was pushing for the Death Star), the birthday boy, mom and I decided on a Lego Landspeeder. Because just like my 7yr old he's infatuated with the Wii Lego games and he's currently playing the Star Wars game.

It started with the basic shape. I used a square pan and just kept cutting until I got the shape I was happy with. I will admit I did bribe my son to rebuild his Landspeeder so that I had a 3D model to work from.
 

Then the dots. Lots of dots. I rolled out fondant. Then I used a straw that I cut down dipped in powdered sugar and then just started making lots of little tiny circles. There was only about a 60% success rate of getting them out of the straw still in the shape of a circle. So if you try this method be prepared to use all of your patience up in this step.

Next came the fun task of putting it together. After cutting out all of the dots the fondant had pretty much dried to rock hard. So I used my handy dandy pizza cutter (normally I use the dull side of a butter knife) to make the individual Lego block impressions. I then rolled out the sides and attached those with pretzel sticks to hold the engines on. And my dear sweet husband made the figures, Luke, Obi-Wan, R2-D2, C-3PO and a Jawa. 


Close up of some of the guys.  

Here is a side by side comparison of the actual with the cake. The Lego Luke and the Fondant Luke are sitting together. 

Here is the actual finished cake. I used crushed up Nilla waffers and Choc animal crackers for the sand and jelly bean rock candies. 

Cruising on Tatooine in Luke's landspeeder. 
 This cake even comes with a Lego instruction manual, and the best part? The book is edible for those who choose not to read the book. 

Thanks for getting this far..... 

Thursday, March 15, 2012

Pot Of Gold At The End Of The Rainbow

My oldest's school was having a fund raising event. So for the cake walk I decided this year to get cupcake boxes. Each box holds 4 cupcakes you can get a pack of 3 boxes for $3.50 at your local chain store that sells cake making supplies. I bought 2 sets and that took exactly 1 box of cake mix. Since the fundraiser is the day before St Patrick's day I thought it'd be ok to go with a St Patty's theme, rainbows and pots of gold.

I frosted each rainbow cake blue and then added a cloud. I cut a rainbow sour candy ribbon in half and used it for my rainbow. SUPER EASY! Then I used a large round tip to dab on some gold "coins" and a green strip around the outside. These were the fastest easiest cupcakes to make EVER. I saw the rainbow cupcakes on Pintrest here's the original site that I used. Thanks for the inspiration!  http://monicajoy.tumblr.com/post/1264292112/late-post-but-i-finally-made-rainbow-cupcakes  

Thursday, March 1, 2012

Lego Birthday Party!

My 7 yr old had a birthday blast! At the very last minute he changed his mind from an Angry Birds birthday theme (I had some really cool ideas) to a Lego themed birthday party. Ok I can roll with that, I'm nothing if not flexible. So I printed out the invitations. I like using postcard paper because it's one size not too big and not too small. I can fit a lot of info on the front and the back. 

So the day of the birthday. I didn't find a whole lot in the way of games that didn't involve the annihilation of my son's lego sets which he would not have been happy about. And we didn't quite have enough of the same pieces so the whole build a bridge/car/building with the exact same blocks game was out. (That seemed to be the primary game that everyone chose for their lego party.) But since I had been planning building giant Angry Bird sets I had my husband's office save all of their brick shaped boxes. (boy did that come in handy!) 

So my first game was a shuffle board using the wrapped boxes and throwing them into a grid taped on the floor using painters tape. It was a HUGE HIT! The kids loved it! The only suggestion I have is don't get the cheap rolls of wrapping paper. I bought two .99 rolls and one good roll... the good roll was the boxes that held up the best. Or you can use contact paper if you can find it in primary colors. (I did block the people's faces for their privacy. Bear with me my photo editing skills aren't that great today!)

Next we did some free play. I just threw some legos on a table and let them go at it.  

Then onto the chopstick game. By this time I had lost some of the kids interest. They just wanted to keep building. But enough wanted to play. Even with the "Cheater Chopsticks" (regular chopsticks with a piece of paper and a rubber band around them both) it was a tough game. 


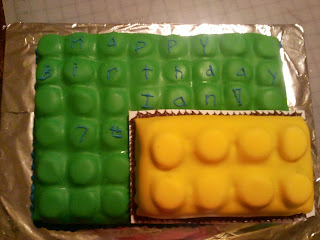
Next onto cake!!! I made a Lego cake out of a sheet cake and a loaf cake pan. Then using marshmallows that I cut in half I placed those on top of the icing and then put a layer of fondant over the whole thing. It was one of the easier cakes to make. 


But since I didn't know what size marshmallows would look best I bought both the regular sized and the new fist Jumbo sized marshmallows. Well the regular ones were the ones that I needed but then I had to decide what to do with jumbo marshmallows. SO I decided to turn them into lego heads. I used food grade markers and drew faces on them. It was a lot like making pumpkins except no messy insides to deal with and there were A LOT more of these guys!

Then we had one more game. Pin the head on the lego man. Can you sense a theme?  I'm apparently obsessed with these heads! I had the hubs draw a pic of a lego body and then cut out lego faces on construction paper. (Thank you Sis-in-law and Mother-in-law for that little bit of last minute help!) 

A good time was had by all. Even if I do think my 4 yr old cheated at this game! It was all in good fun.